The next PAW cloud upgrade is occurring tonight September 19th
The link to the changes is below
What’s coming next in IBM Planning Analytics 2.0.90 SC
The link to the Defect resolution is below
IBM Planning Analytics 2.0 Fix Lists
Deprecation notices – as advised last time
- Classic cube viewer to be removed from Planning Analytics Workspace 2.0.90
As of Planning Analytics Workspace 2.0.90, the classic cube viewer will be removed from Planning Analytics Workspace.
Any existing classic cube viewer will be converted to a new experience cube viewer when first opened in Planning Analytics Workspace 2.0.90.
Key callouts in this upgrade
- Insert spacer rows and columns in explorations
You can now insert spacer rows and columns in explorations through the right-click menu. This is a useful for building stylised views of data in books.
![]()
To insert a spacer:
- Select a row or column and right-click a row or column header in an exploration.
- Click Add spacers and select where you want to insert the spacer row or column.
A spacer row or column is inserted at the position you selected.
![]()
You can copy and paste a row or column with spacer cells. However, the spacer cells can break some spreads.
To remove a spacer row or column, right-click the spacer header cell and select Remove.
Changes in Books and Reporting
- Set synchronisation properties for multiple widgets simultaneously
You can now set synchronisation properties for multiple widgets at the same time. Previously, you could set synchronisation properties for only one widget at a time.
In edit mode, select multiple widgets with Ctrl + click or by using the mouse drag action.
Then, under Properties > Synchronisation, choose the synchronisation properties you want to apply to the widgets.
When you select multiple widgets, only the synchronisation properties that apply to all selected widgets display. The following properties are available if you select:
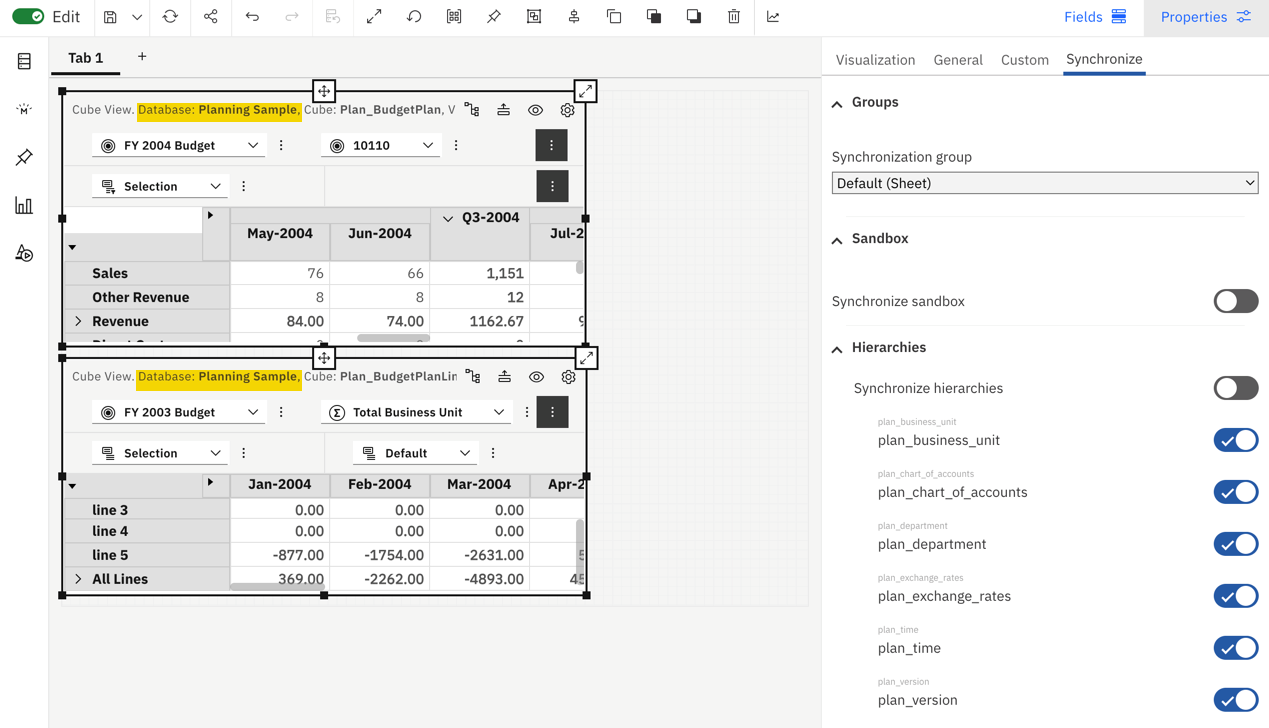
- Cube views from the same database
The Synchronisation group, Synchronise sandbox, and Synchronise hierarchies properties are available. You can synchronise only those common hierarchies to both cube views; other hierarchies do not display.
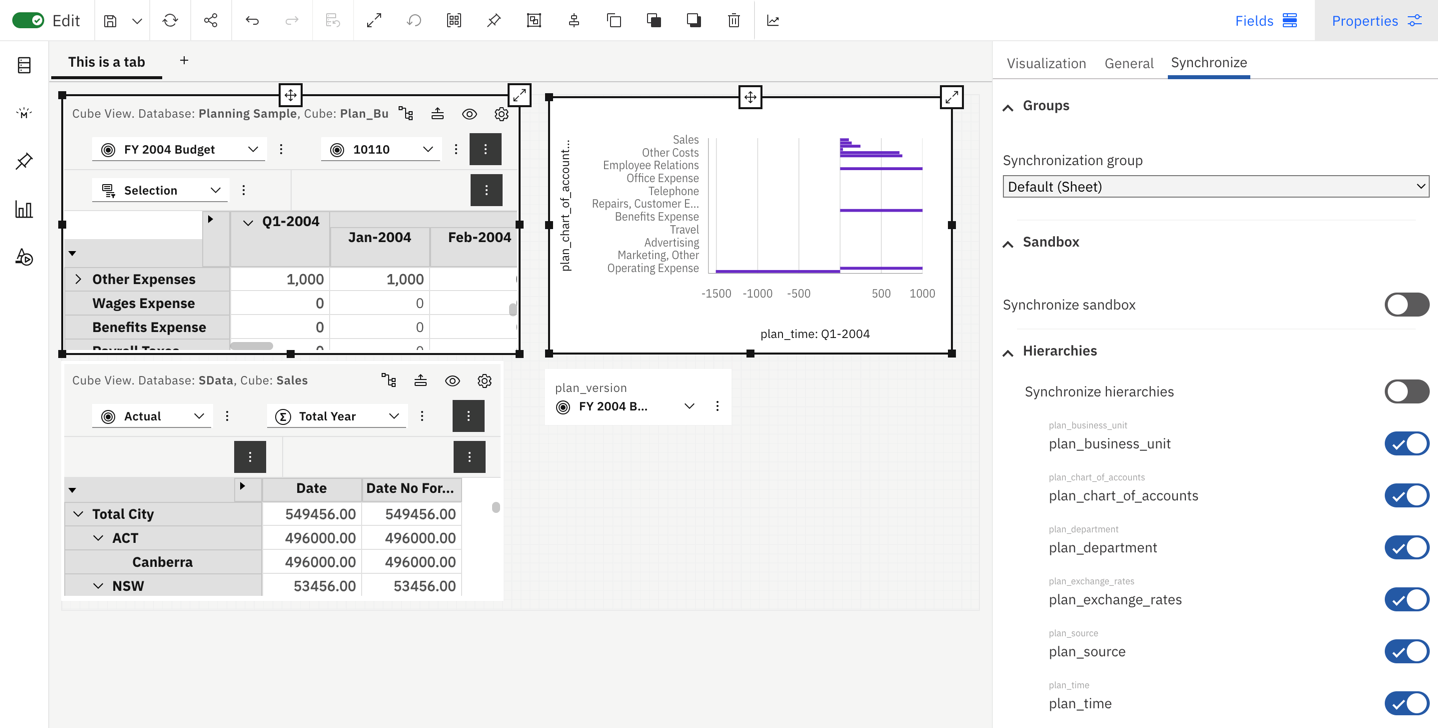
- Cube views from different databases
The Synchronisation group and Synchronise sandbox properties are available. You can also enable the Synchronise hierarchies property to turn on synchronisation, but since there aren’t any common hierarchies between the selected widgets, there are no hierarchies to select.
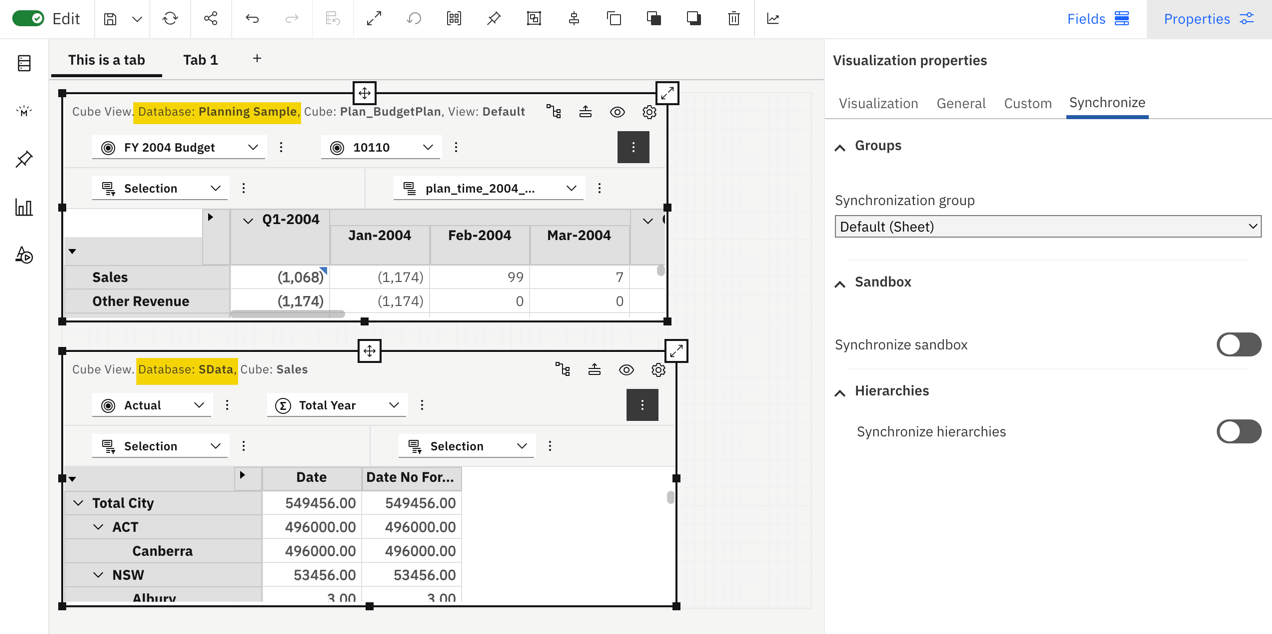
- Cube view and shape widget
Since the shape widget does not have synchronisation properties, no synchronisation properties display.

The order in which the synchronisation properties display in Synchronisation groups and Synchronise hierarchies is determined by the widget you select first. For example, if the first widget you select is in the Book synchronisation group, the Book option appears first in the Synchronisation groups list.
- Ability to delete data from single cell widgets removed
You can no longer use the Delete key to delete data from single-cell widgets. The Delete key function is disabled on the contents of a single cell widget to prevent accidental deletion of data. However, you can modify data in a single-cell widget, including clearing the value to display 0, or delete the single-cell widget altogether.
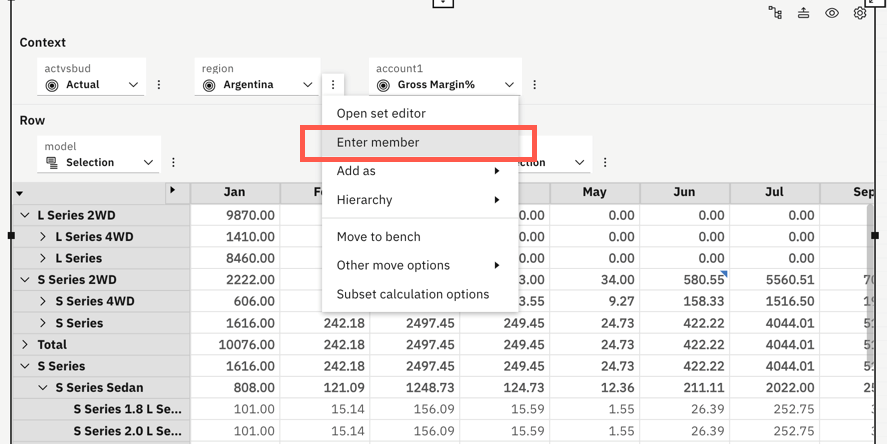
- Select a member or set by typing its name in an exploration view
The exploration view now offers a quick selection of a member or set. You can open an input box from a dimension tile in the Context or Bench area to enter a member name or Member ID and update the view with that member. Similarly, you can open the input box from a tile in the Row or Column area and type the set name to update the view with that set.
- Replace button now works on selections in the Current set
The Replace button in the set editor now also works on your selections in the Current set pane. You can select members on both sides of the set editor, either the Available members or the Current set, and replace members in the view.
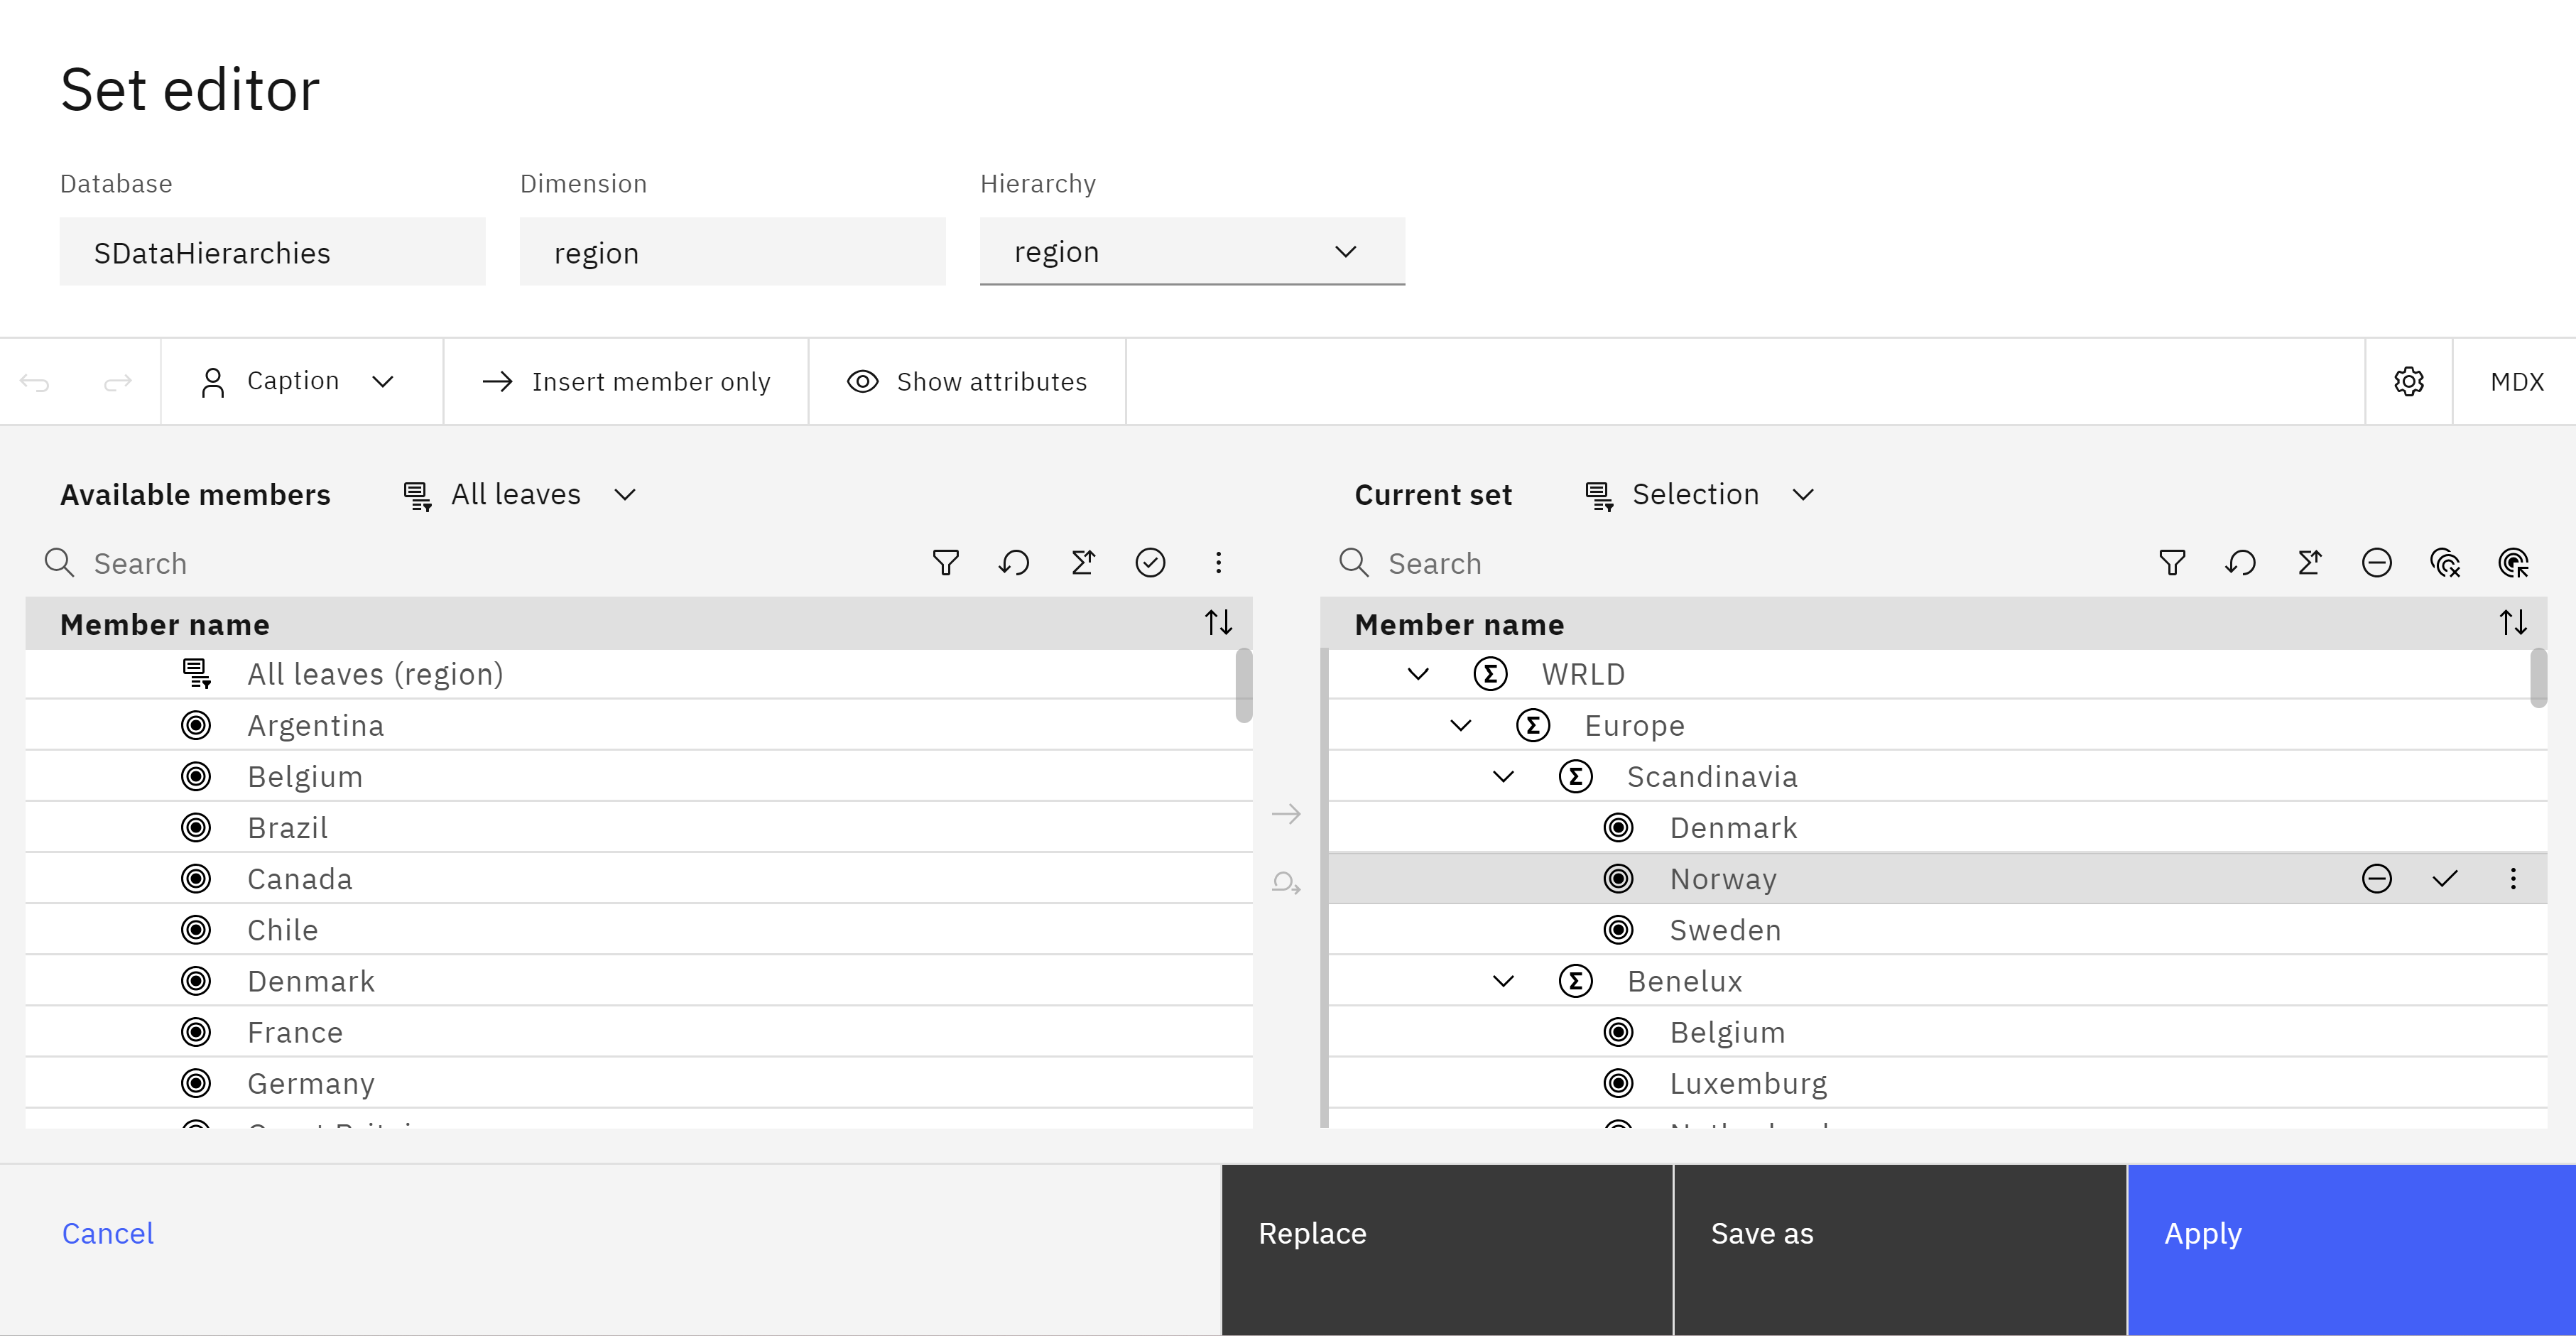
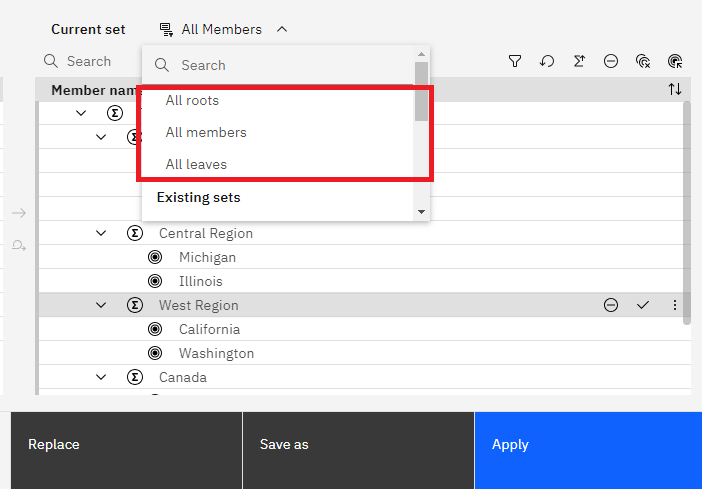
- Virtual set and reset features are now available for the current set in the set editor
All virtual sets (All roots, All members, and All leaves) in the Available members pane in the set editor are now also available in the Current set pane. Additionally, reset features are now available in the Current set pane.
The availability of virtual sets in the Current set pane lets you work with these sets without having to toggle Available members back on when you are in single-pane mode.
Changes in Plans and Applications
- Usability improvements to the contribution page in Applications and Plans
The contribution page in Applications and Plans includes several usability enhancements that make navigating between applications and plans easier or working with assets.
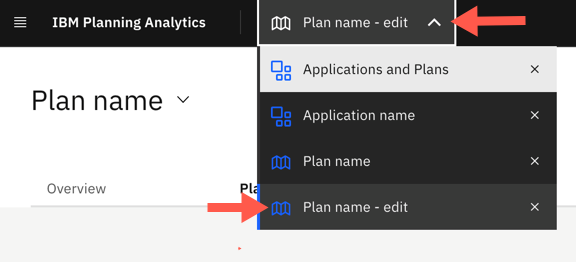
Easy to identify contribution mode in the content menu
When you open an application or a plan to the contribution page, the application or plan name displays in the content menu.
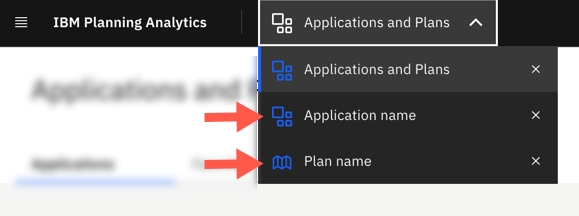
You can now easily differentiate between an application or plan that is in contribution and edit mode. An application or plan that is in edit mode displays in the content menu with an “- edit” appended to its name.
Assets open in the same page
Assets now open in the same page as the application or plan when you access them on the contribution page. Previously, when you opened an asset in an application or plan, the asset opened on a new page and displayed as a separate page in the content menu.
Editing of assets restricted in contribution mode
You can no longer edit assets in applications or plans when you are in contribution mode. You can enter values in an exploration view or change the visualisation type in contribution mode but you cannot add a new widget to the asset or change the asset’s properties.
You can make changes to an the asset in Reports and Analysis.
Changes in Modelling
- Work with database logs on the modeling workbench
You can now access the server, transaction, and audit logs for a database directly from the modelling workbench in Planning Analytics Workspace.
Access to server logs is available only on the modelling workbench. You cannot open logs from a book.
The option to open the server and transaction logs is available for all databases. the Audit log configuration parameter must be enabled for the database.
You can still download database logs from the Databases page in Planning Analytics Administration.
- To open any of the available database logs, open a modeling workbench.
- Right-click the database on the Data
- Click Logs.
- Click the log that you want to open.

The log you click opens in a new tab on the modelling workbench. All logs include a filter to specify the period to display records. The audit and transaction logs also include additional filters to apply to the records shown in the log viewer.
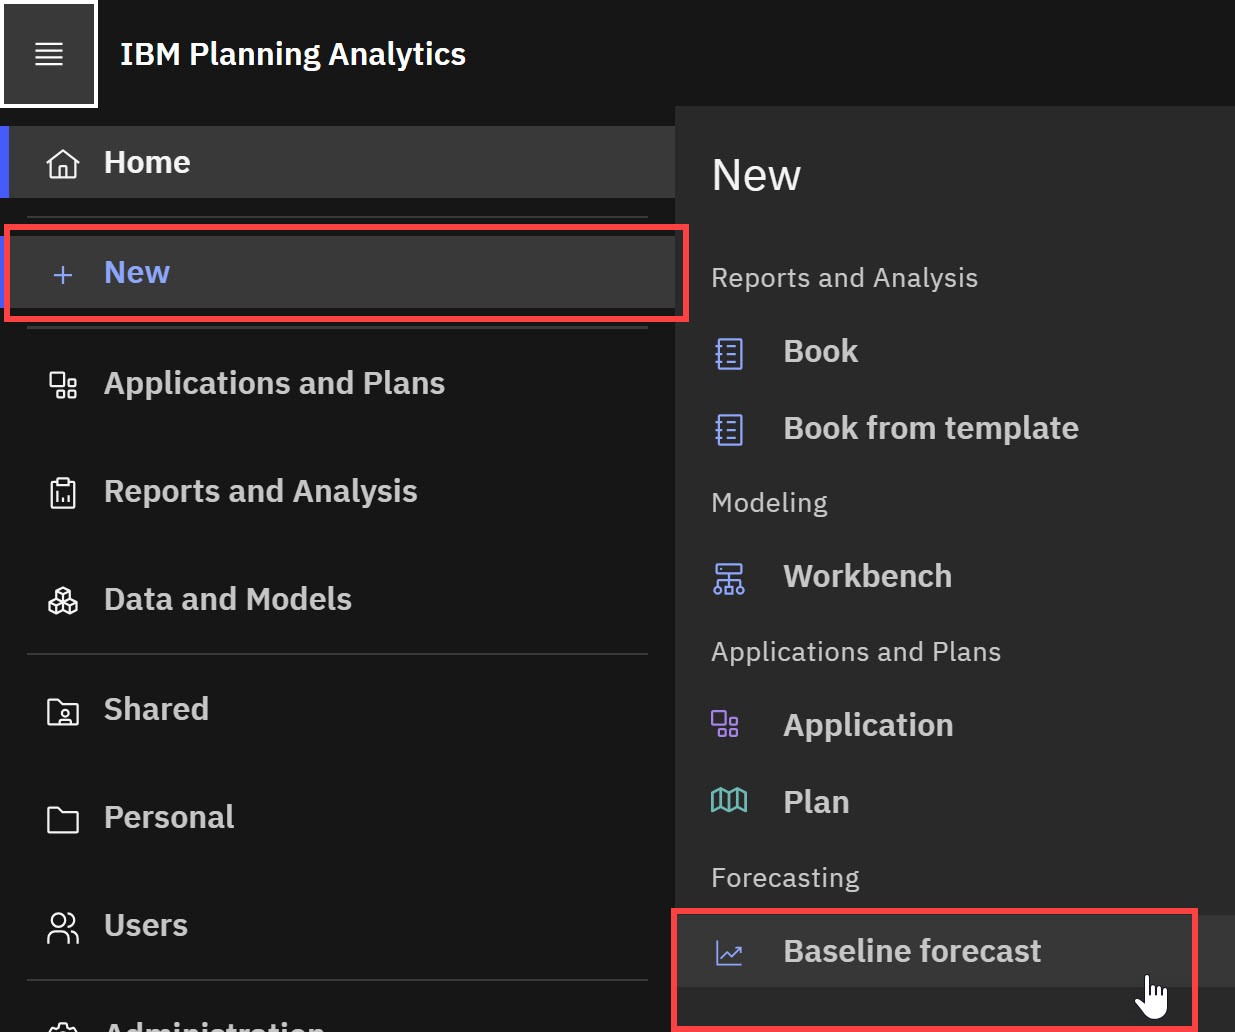
- Use baseline forecasting to create and share forecasts
A baseline forecast is a new Planning Analytics Workspace asset that administrators and modelers can create and share with other users in your organisation. Administrators, modelers, and analysts with the appropriate permissions can run the baseline forecast at any time and use the forecast to improve the planning process. Consumers cannot run baseline forecasts.
Baseline forecasts enhance the existing forecasting capabilities in Planning Analytics Workspace. You can still create and run ad-hoc forecasts on explorations in a book.
You can create a baseline forecast from the Planning Analytics Workspace home menu.
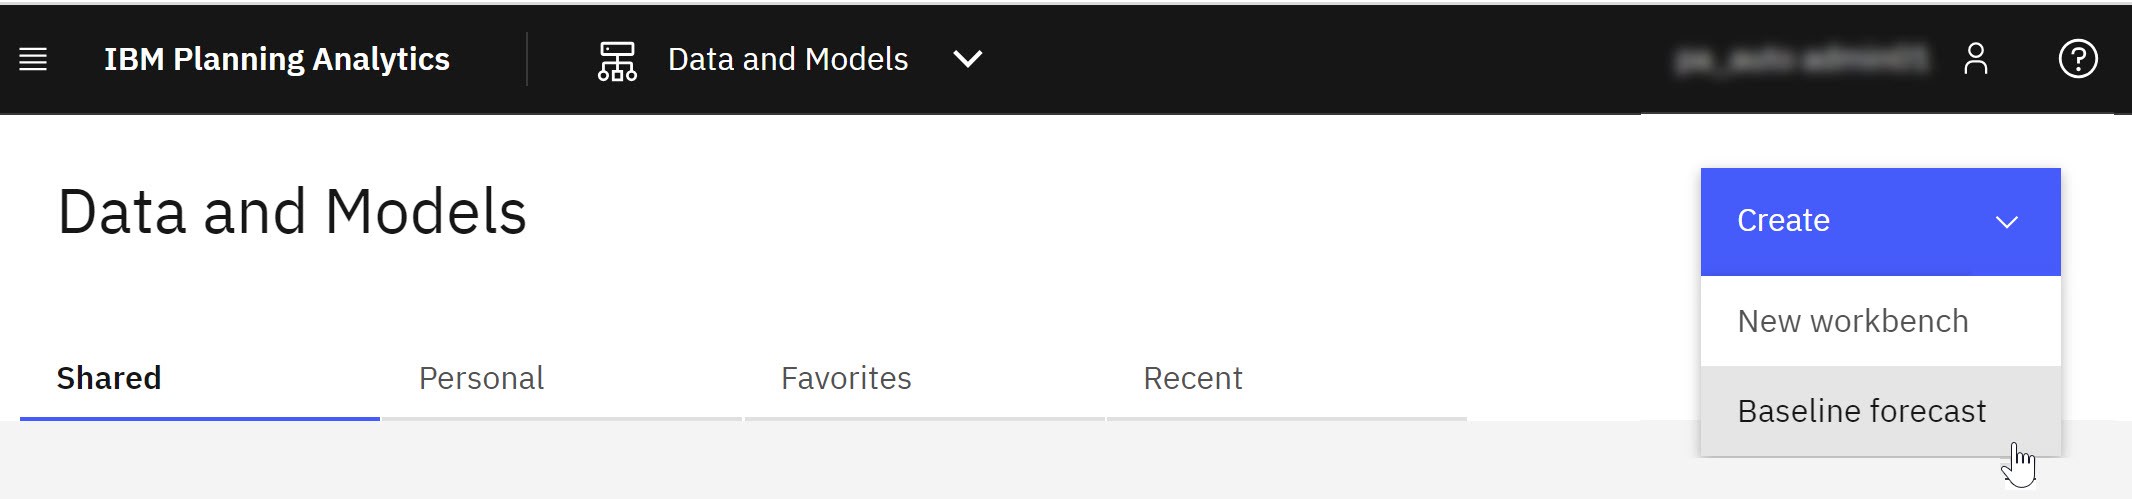
You can also create a baseline forecast from the Data and Models page.
Baseline forecasts are created using the same settings and parameters you are familiar with from creating ad-hoc forecasts on explorations. You set the forecast’s timeframe, scope, and optional advanced settings.
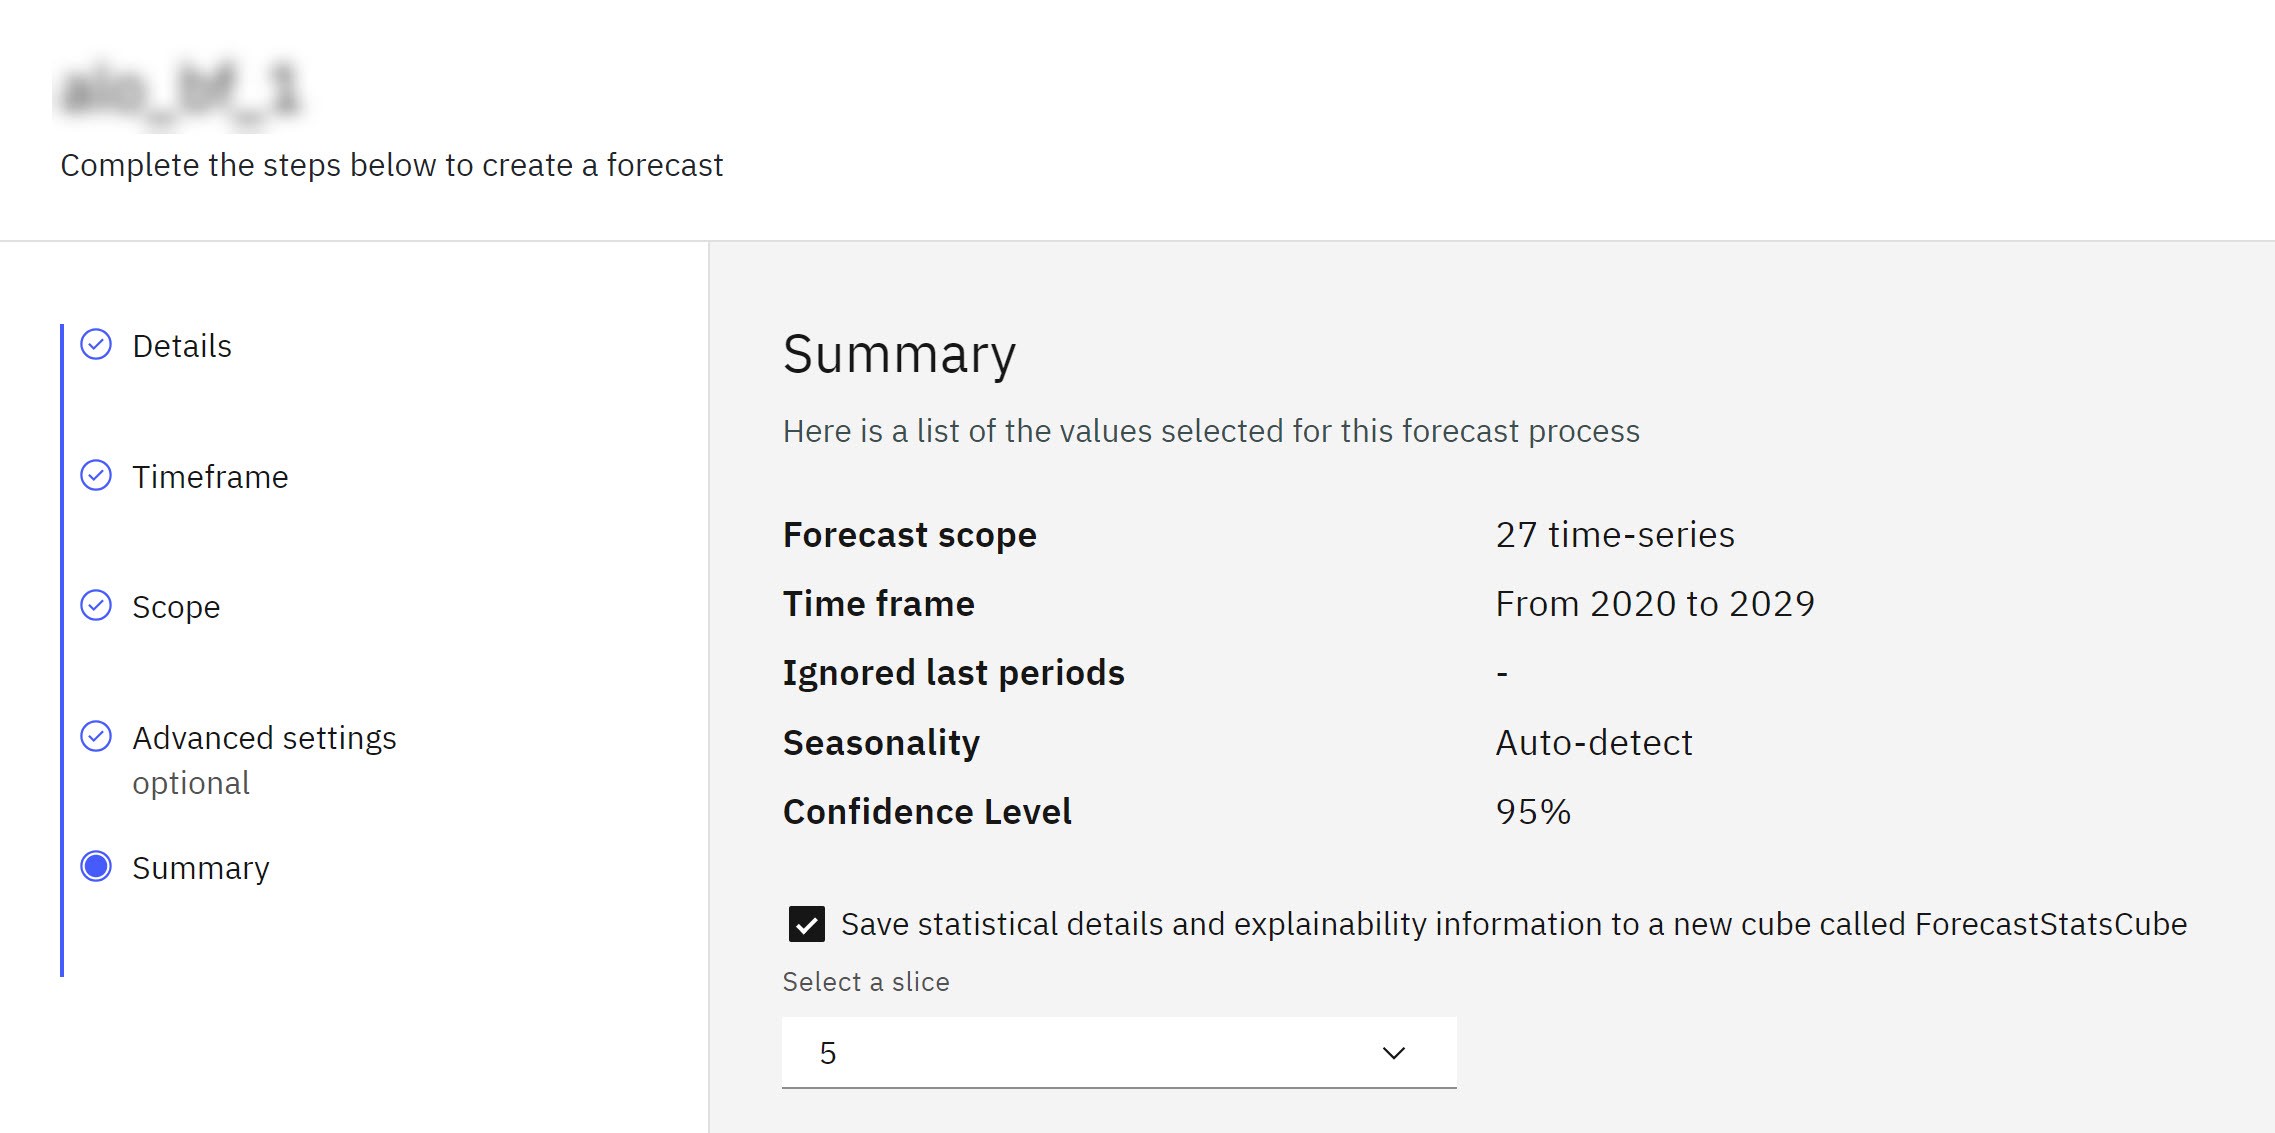
After the baseline forecast is defined, saved, and activated, it’s available as an asset on both the Data and Models page and the Reports and Analysis page, where other users can open and run the forecast.
Changes in Administration
- Simplified process to rename databases, snapshots, and user groups
A new Edit option on the Databases, Lifecycle Management, and Users and groups pages simplifies the renaming process.
In Planning Analytics Administration, select a database, snapshot, or user group on the relevant administration page, then click to modify the item name. You can also modify the description for snapshots and user groups.
Note that a database must be stopped before you can rename it.
- View a user’s last login in Planning Analytics Administration
An enhancement in Planning Analytics Workspace 2.0.87 added the ability to view the last login for a user when you downloaded a user report from the Users and groups page. You can now view the last login for a user directly in Planning Analytics Administration without downloading a report.
- Open Planning Analytics Administration.
- Click the Users and groups
- Click the Users
- Click a user.
- Click the Details tab for the user to review the last login.