Key callouts in this upgrade
- Deprecation notice
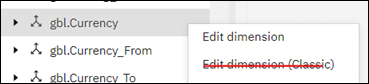
As previously noted, the classic dimension editor will be removed from Planning Analytics Workspace 2.0.92. It covers both the Edit dimension (Classic) and the Edit hierarchy (Classic). This change will occur in both the Workbench and Books
- Create and edit multiple Planning Analytics Local environments (Local only)
You can now manage multiple environments in Planning Analytics Administration Local.
See more details of this change in the Changes to Administration section below
Changes in Books and Reporting
- Changes to single-cell widget properties
The Show as cell property for single-cell widgets has been updated only to control the display of an outline around values in single-cell widgets.
A new property, Enable editable cell, now allows modification of values in single cell widgets. Previously, you could modify values in single-cell widgets with the Show as cell property but couldn’t remove the outline around values in the widgets.
- Enable the Show as cellproperty under Properties > Custom > Exploration features to display an outline around the value in a single cell widget.
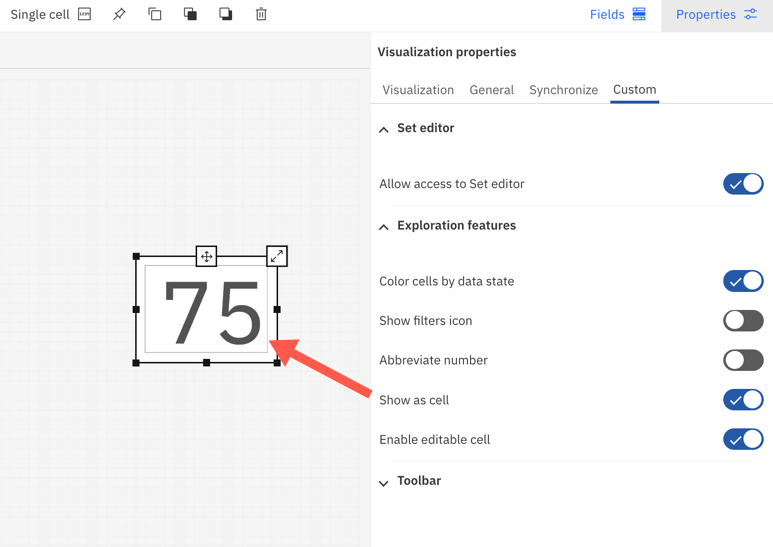
- To modify values in a single cell widget, turn on the Enable editable cellproperty under Properties > Custom > Exploration features.
- The Show as celland Enable editable cell properties, are turned on by default in new single cell widgets.
- When you upgrade to Planning Analytics Workspace 0.92, if an existing single cell widget is set to Show as cell, then both the Show as cell and Enable editable cell properties are enabled in 2.0.92.
Changes in Plans and Applications
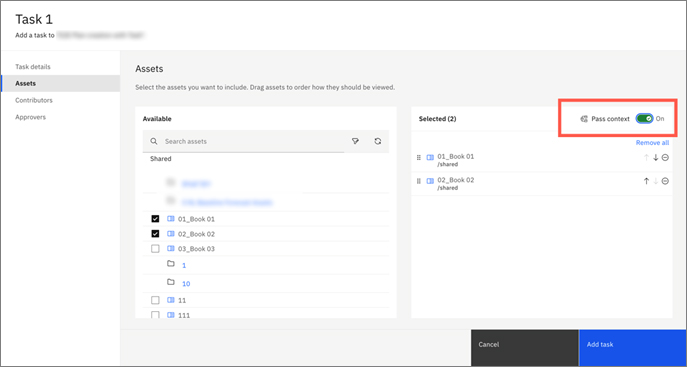
- Pass context between books in an application or plan
You can now pass context between books that are added as assets in an application or a plan that use the same synchronisation group.
When you add books to sections in an application or tasks in a plan, enable the new Pass context option to pass context between any books with synchronisation enabled and use the same synchronisation group.
Remember: Before you can pass context between books of the same application or plan, you need to first setup synchronisation in these assets in Reports and Analysis.
-
- The Pass context feature supports all three synchronisation groups (Book, Sheet, and Custom) and synchronisation of hierarchies and gestures.
-
- When you pass context between books that are synchronised at the book level, the sourcebook is the one that opens first and has a checkmark next to its name in the application section or plan task. The target book is the book that you click on next.
-
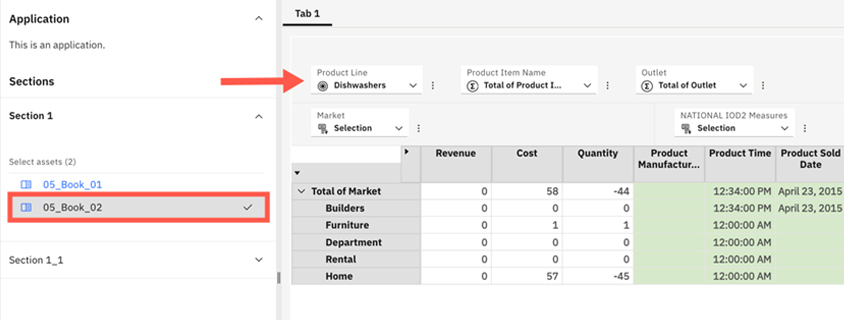
- In the following example, Book_01 and Book_02 are synchronised at the Book level. Book_01 is the sourcebook in application Section 1.

-
- When you change the Product Line to Dishwashers in Book_01 and go to Book_02, the hierarchy in Book_02 automatically updates to Dishwashers.
-
- In books synchronised at the sheet level, you can choose the source tab but not the target tab. The target tab is always the first tab of whichever book you click on after you make changes to the sourcebook.
-
- Similarly, in custom group-level synchronisation, widgets that belong to the same group will be synchronised together when you enable Pass context for books in an application or plan. As members of a hierarchy that are displayed in one widget in the source book change, the same members are displayed in synchronised widgets that use the same hierarchy in the target book.
Changes in Modelling
- Process editor improvements
The Script tab on the process editor in Planning Analytics Workspace 2.0.92 introduces several performance and usability improvements that make creating and managing your process scripts easier.
- Improved scrolling
Scrolling is now more responsive for scripts that exceed a single page view, improving performance over previous versions.
- Error and warning reporting
The toolbar on the Script tab of the process editor includes a new Errors and warnings icon.

Click Errors and Warnings to reveal an error and warning panel at the bottom of the process editor. Click any warning or error in the panel to go directly to the line in your process script where the error or warning occurs.
- Select all lines within a script section.
A process script contains four sections: Prolog, Metadata, Data, and Epilog.
When you press CTRL+A (select all), all lines within the section where the cursor is positioned are selected.
So, only those lines will be selected if you are in the Prolog.
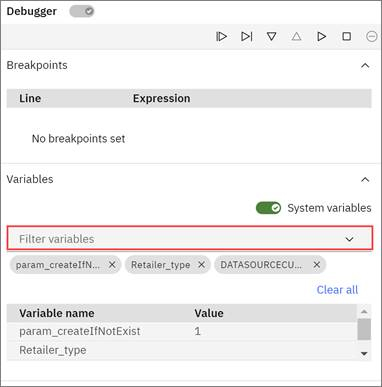
- Filter variables during debugging
You can now use a filter to examine only selected variables while debugging a process.
The Variables section of the Debugger includes a Filter variables option.
-
-
- Click Filter Variables and select a variable you want to include in the debugging process.
- You can specify multiple variables for inclusion in debugging, but you must click Filter variables for each variable that you want to include.
- If you do not set a filter to include at least one variable for inclusion during debugging, all variables are examined during debugging.
- Only local process variables are shown by default when you click Filter variables.
- To include system variables for selection, toggle System variables to the On position.
-
This example shows the Debugger configured to include three variables in debugging.
Changes in Administration – all Local
- Add an individual user in Planning Analytics Administration (Local only)
A new UI option lets you add an individual user in Planning Analytics Administration Local.
You can continue to upload a .csv file to add multiple users to Planning Analytics Workspace Local.
- Click the Administration tile on the Planning Analytics Workspace home page.
- Click the Users and Groups
- Click the Users
- Click Add.
- Enter the required information for the new user, then click Add.
- Create and edit multiple Planning Analytics Local environments (Local only)
You can now manage multiple environments in Planning Analytics Administration Local.

To create a new environment:
- Click the Administration tile on the Planning Analytics Workspace home page.
- Click the Environments
- Click Create.
- Enter an Environment name, Spreadsheet service URL, and Admin host, then click Create.
Note that the Admin host you specify determines which databases are available in the environment. Only the databases registered on the specified admin host are available in the environment.
To edit or delete an existing environment, click the environment name on the Environments page, then click the appropriate icon.
You can assign an individual user to any combination of available environments. Users can have different roles in different environments. For example, a modeler in Environment 1 could be assigned the analyst role in Environment 2.
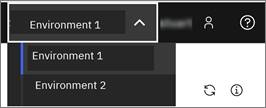
When you log in to Planning Analytics Local and access multiple environments, an environment switcher is available on the Planning Analytics Workspace Local home page adjacent to your user name. You can click the switcher to switch between environments that are available to you.
Tip: If you have multiple environments available to your users, consider applying a custom theme to each environment to make it easier to differentiate between environments visually.